
 Pin it
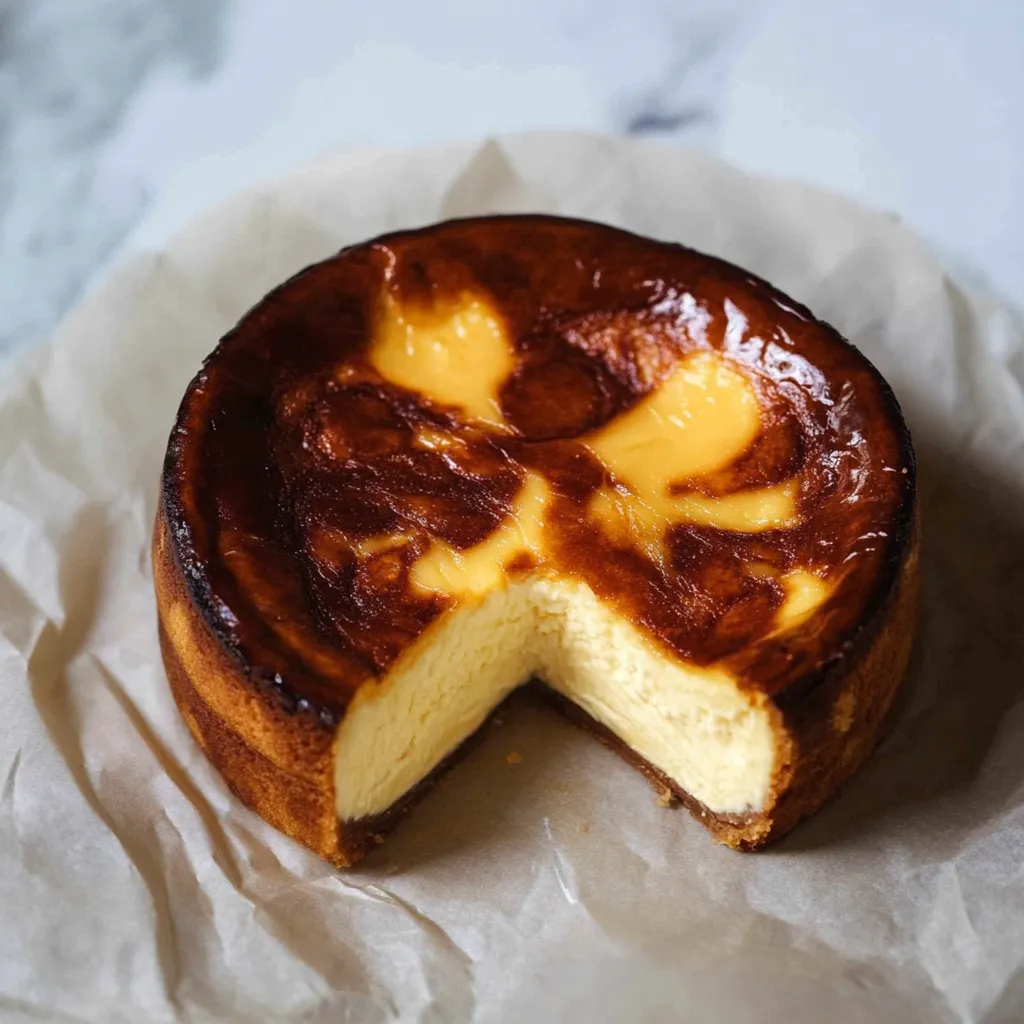
This silky small-batch 4-inch burnt Basque cheesecake offers an amazing sweet treat without making a giant cake. Its golden-brown exterior and soft center make it just right for one or two folks who enjoy rich flavors in a smaller package.
I first tried burnt Basque cheesecake while visiting San Sebastian and got totally hooked on matching that perfect blend of caramelized outside and creamy inside. This tiny version has become what I make whenever I need to wow someone without spending forever cooking.
What You'll Need
- Softened cream cheese: Creates the main tangy foundation and velvety consistency for that real cheesecake taste
- Heavy whipping cream: Brings luxury and helps create that smooth inside; try to get cream with 36% fat or more
- Sour cream: Cuts through sweetness with a bit of tang that makes the flavor pop
- One egg: Holds everything together while giving the cake its structure
- Vanilla extract: Boosts all the flavors; grab pure extract if you can
- Sugar: Adds sweetness and helps make that beautiful dark top
- Flour: Just a tiny bit helps keep everything together without making it too dense
How To Make It
- Get Everything Ready:
- Move your oven rack to the very top spot and heat it to 500°F for at least 15 minutes so the heat spreads evenly. Put parchment paper in your 4-inch pan with about 2 inches sticking up past the edges so the cake can rise and you can lift it out easily later.
- Create Your Base:
- Put your softened cream cheese, heavy cream, and sour cream in a bowl and mix them with a whisk or mixer on low until there aren't any lumps at all. Take your time with this part—about 2-3 minutes—since it's the backbone of your cheesecake.
- Finish The Mixture:
- Throw in your egg, vanilla, and sugar to the cream cheese mix and whisk until smooth. Then add the flour and stir just until it's mixed in. Don't go crazy mixing or you'll trap too much air and mess up the texture.
- Cook It Up:
- Pour everything into your lined pan and stick it on the top rack at the back of the oven where it's hottest. Right away, turn the temperature down to 450°F and bake for exactly 20 minutes. The top will turn that lovely dark color while keeping the inside creamy.
 Pin it
What I love most about making this is watching people's faces when they taste how the caramelized top contrasts with the super creamy center. Even my husband, who always said he hated cheesecake, fell in love with this version immediately.
Keeping It Fresh
You can keep this little Basque cheesecake in a sealed container in the fridge for up to 3 days. It actually tastes better after sitting for a day as the caramel flavors blend into the creamy part. I've found it's most delicious on the second day when everything has settled and gotten more intense. If you want it warm after it's been in the fridge, just let it sit out for about 30 minutes before eating.
Getting The Paper Just Right
The trick to real Basque cheesecake is setting up your parchment paper correctly. Cut a square roughly 12x12 inches for a 4-inch pan. Push it gently into the pan, making folds around the edges, letting it stick up about 2 inches above the rim. These casual creases not only help you take out the cheesecake but also add to its unique look. Don't stress about making it neat; this dessert looks best when it's a bit messy.
 Pin it
Ways To Serve It
This tiny cheesecake is amazing just by itself but can be dressed up with simple extras. A light sprinkle of powdered sugar makes it look prettier without changing the complex taste. For a fancy option, try it with a small glass of Pedro Ximénez sherry or a shot of espresso to match the caramel notes. For special moments, a few fresh berries on the side add a nice tart contrast to the rich creaminess. I really love eating it slightly warm with a tiny drizzle of local honey and some flaky sea salt.
Frequently Asked Questions
- → Why is burnt Basque cheesecake so special?
This cheesecake stands out for its creamy core and caramelized top. Unlike regular cheesecakes, it skips the crust and is baked fast at high heat, developing its signature 'burnt' look and unique flavor.
- → What kind of pan works best for this?
You'll need a 4-inch pan to craft this smaller-sized dessert. It's perfect for one or two servings.
- → Can I tweak the ingredients?
Sure, you can swap sour cream for Greek yogurt or use a non-dairy heavy cream substitute. Keep in mind, though, it might slightly alter the texture and flavor.
- → How can I stop it from sticking to the pan?
Place parchment paper inside the 4-inch pan before pouring in the batter. It'll ensure the cheesecake releases smoothly once done.
- → Can I save leftovers, and what’s the best way?
Yes, you can refrigerate leftovers in a sealed container for up to three days. Eat it straight from the fridge or let it warm to room temperature first.
- → What helps get the perfect burnt top?
Set the oven rack close to the top heat source, allowing it to caramelize that iconic layer properly.